Finishing drywall outside corners is a crucial step in the drywall installation process, as it ensures a smooth, professional-looking finish. Outside corners, where two drywall panels meet at a 90-degree angle, are prone to damage and cracking if not properly finished. Finishing these corners involves applying joint compound, fiberglass mesh tape, and sanding to create a seamless and durable surface.
Properly finished outside corners are not only aesthetically pleasing but also structurally sound. They prevent cracks from forming and spreading, maintaining the integrity of the drywall and the overall structure. Additionally, finished outside corners provide a solid base for painting or applying other decorative finishes, ensuring a uniform and professional-looking result.
Finishing drywall outside corners is a relatively simple process that can be completed with basic tools and materials. However, it requires precision and attention to detail to achieve a high-quality finish. By following proper techniques and using the right materials, you can ensure that your drywall outside corners are durable, aesthetically pleasing, and ready for further finishing steps.
Finish Drywall Outside Corners
Finishing drywall outside corners is a crucial step in the drywall installation process, ensuring a smooth, professional-looking finish. Here are eight key aspects to consider:
- Materials: Joint compound, fiberglass mesh tape, sanding sponge
- Tools: Putty knife, corner applicator, sander
- Preparation: Clean and prime the corner
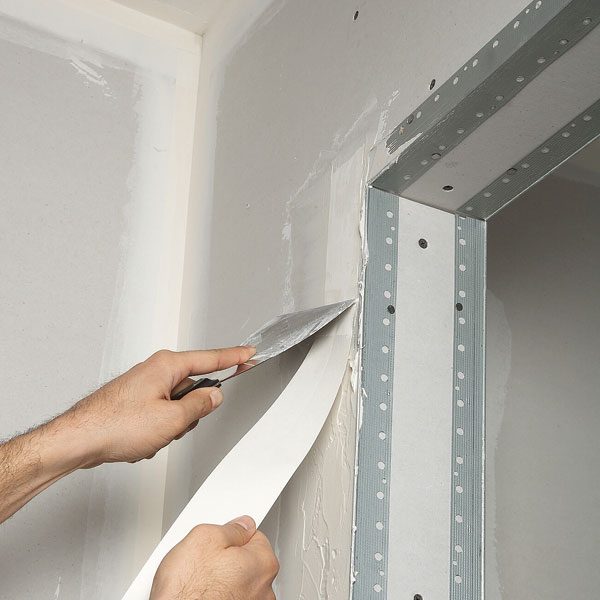
- Application: Apply joint compound, embed mesh tape, and smooth
- Drying: Allow the compound to dry completely
- Sanding: Sand the corner smooth and flush
- Priming: Prime the corner before painting or applying other finishes
- Durability: Finished outside corners prevent cracks and damage
These key aspects are interconnected and essential for achieving a high-quality finish. Proper preparation ensures a strong bond between the joint compound and the drywall. The application of mesh tape reinforces the corner, preventing cracks from forming. Drying and sanding allow the compound to set and create a smooth surface. Priming prepares the corner for further finishing and enhances its durability. By following these steps and paying attention to these key aspects, you can ensure that your drywall outside corners are not only aesthetically pleasing but also structurally sound.
1. Materials
Joint compound, fiberglass mesh tape, and sanding sponge are essential materials for finishing drywall outside corners. Joint compound is a type of plaster used to fill gaps and smooth surfaces. Fiberglass mesh tape is a strong, flexible material that is embedded in the joint compound to reinforce the corner and prevent cracks from forming. Sanding sponge is used to smooth the joint compound and create a seamless finish.
The combination of these materials is what makes it possible to achieve a high-quality finish on drywall outside corners. Joint compound fills the gaps between the drywall panels and creates a smooth surface. Fiberglass mesh tape reinforces the corner and prevents cracks from forming. Sanding sponge smooths the joint compound and creates a seamless finish.
Using the right materials for finishing drywall outside corners is essential for achieving a professional-looking and durable finish. Joint compound, fiberglass mesh tape, and sanding sponge are the three key materials that you need to complete this task. By understanding the of each material and how they work together, you can ensure that your drywall outside corners are finished to a high standard.
2. Tools: Putty knife, corner applicator, sander
The putty knife, corner applicator, and sander are essential tools for finishing drywall outside corners. Each tool plays a specific role in the process, and using the right tool for the job is essential for achieving a high-quality finish.
The putty knife is used to apply joint compound to the corner. It is important to use a putty knife that is the right size for the job. A putty knife that is too small will make it difficult to apply the joint compound evenly, and a putty knife that is too large will make it difficult to control the amount of joint compound that is applied.
The corner applicator is used to embed fiberglass mesh tape into the joint compound. The corner applicator helps to ensure that the mesh tape is applied evenly and that it is properly embedded in the joint compound. This helps to prevent cracks from forming in the corner.
The sander is used to smooth the joint compound and create a seamless finish. It is important to use a sander that is designed for sanding drywall. A sander that is not designed for sanding drywall may damage the drywall.
Using the right tools for finishing drywall outside corners is essential for achieving a high-quality finish. The putty knife, corner applicator, and sander are the three essential tools that you need to complete this task. By understanding the role of each tool and how to use it properly, you can ensure that your drywall outside corners are finished to a professional standard.
3. Preparation
Preparing the corner by cleaning and priming is a fundamental step in finishing drywall outside corners. It ensures a strong bond between the joint compound and the drywall, creating a durable and professional-looking finish.
- Cleaning the corner:
Before applying any joint compound, it is essential to clean the corner of any dust, dirt, or debris. This will help the joint compound to adhere properly and prevent any imperfections in the finished surface.
- Priming the corner:
Applying a primer to the corner helps to seal the surface and create a more uniform base for the joint compound. Primer also helps to prevent the joint compound from absorbing too much moisture from the drywall, which can lead to cracking and peeling.
By properly cleaning and priming the corner, you can ensure that the joint compound will adhere properly and create a strong, durable finish. This will help your drywall outside corners to look their best for years to come.
4. Application
In the process of finishing drywall outside corners, the application of joint compound, embedding of mesh tape, and smoothing are crucial steps that determine the quality and durability of the finished corner. These steps work together to create a seamless and reinforced surface that is resistant to cracking and damage.
- Applying joint compound:
The application of joint compound fills gaps and creates a smooth surface. It is important to use a high-quality joint compound that is specifically designed for drywall. The joint compound should be applied evenly and allowed to dry completely before sanding.
- Embedding mesh tape:
Mesh tape is a strong, flexible material that is embedded in the joint compound to reinforce the corner. It helps to prevent cracks from forming and ensures a durable finish. The mesh tape should be applied evenly and pressed into the joint compound using a corner applicator.
- Smoothing:
Once the joint compound has dried, it is sanded smooth using a sanding sponge or sanding block. This step removes any imperfections and creates a seamless surface. It is important to sand lightly and avoid over-sanding, which can damage the drywall.
By following these steps carefully and using the proper materials and techniques, you can achieve a professional-looking and durable finish on your drywall outside corners. This will help to protect your drywall from damage and create a smooth, seamless surface that is ready for painting or other decorative treatments.
5. Drying
Drying is an essential step in the process of finishing drywall outside corners. Allowing the joint compound to dry completely ensures a strong, durable, and smooth finish.
- Strength and durability:
When joint compound is applied to outside corners, it needs to be allowed to dry completely to gain its full strength. This ensures that the corners are resistant to cracking and damage, providing a long-lasting finish.
- Adhesion:
Proper drying allows the joint compound to adhere properly to the drywall surface. This creates a strong bond that prevents the compound from peeling or chipping away, maintaining the integrity of the corner.
- Smooth finish:
Drying allows the compound to shrink and settle, resulting in a smooth and even surface. This is essential for creating a professional-looking finish that is ready for painting or other decorative treatments.
- Preventing moisture damage:
Drying the joint compound completely helps to prevent moisture from becoming trapped within the corner. This can lead to mold growth, damage to the drywall, and a compromised finish.
By allowing the joint compound to dry completely before sanding and painting, you can ensure a high-quality finish that is both durable and aesthetically pleasing. This will protect your drywall outside corners from damage and extend their lifespan.
6. Sanding
Sanding is an essential step in finishing drywall outside corners, as it ensures a smooth, even surface that is ready for painting or other decorative treatments. Sanding also helps to remove any imperfections or rough edges that may have formed during the application of joint compound and mesh tape.
- Creating a smooth surface:
Sanding helps to level the joint compound and create a smooth, seamless surface. This is important for achieving a professional-looking finish that is free of bumps or ridges.
- Removing imperfections:
Sanding can remove any imperfections or rough edges that may have formed during the application of joint compound and mesh tape. This helps to create a clean, uniform surface that is ready for painting or other decorative treatments.
- Preparing for painting:
Sanding creates a smooth, even surface that is ideal for painting. It helps the paint to adhere properly and provides a smooth, professional-looking finish.
- Durability:
Sanding helps to compact the joint compound, making it more durable and resistant to cracking or chipping. This extends the lifespan of the drywall outside corners and ensures that they maintain their appearance over time.
Sanding is a relatively simple step, but it is important to take your time and sand carefully to avoid damaging the drywall. Once you have sanded the corner smooth and flush, you can be sure that you have created a strong, durable, and professional-looking finish that will last for years to come.
7. Priming
Priming the corner before painting or applying other finishes is an essential step in the process of finishing drywall outside corners. Primer helps to create a smooth, even surface that is free of imperfections and provides a strong base for paint or other finishes. It also helps to prevent the joint compound from absorbing too much moisture, which can lead to cracking and peeling.
Without primer, paint or other finishes may not adhere properly to the joint compound, resulting in a poor-quality finish that is more susceptible to damage. Primer helps to create a barrier between the joint compound and the finish, ensuring a strong bond and a durable, long-lasting finish.
In addition, primer can help to seal the surface of the joint compound, preventing moisture from penetrating and causing damage. This is especially important in areas that are prone to moisture, such as bathrooms and kitchens. By priming the corner before painting or applying other finishes, you can help to ensure a professional-looking, durable finish that will last for years to come.
8. Durability
Finishing drywall outside corners is crucial for ensuring the durability and longevity of drywall installations. By properly finishing outside corners, you can prevent cracks and damage from occurring, maintaining the integrity of the drywall and the overall structure. Cracks in drywall outside corners can be caused by a number of factors, including movement of the building, impact, and moisture. Finished outside corners provide a reinforced and protected surface that is less susceptible to these factors.
Unfinished outside corners are more vulnerable to damage because they lack the reinforcement and protection provided by joint compound, fiberglass mesh tape, and sanding. This can lead to cracks forming and spreading, compromising the structural integrity of the drywall and potentially leading to more costly repairs in the future. By finishing outside corners, you can create a strong and durable surface that is less likely to crack or be damaged, saving you time and money in the long run.
In addition to preventing cracks and damage, finished outside corners also provide a smooth and professional-looking finish. This is especially important in areas that are visible, such as living rooms, bedrooms, and hallways. By taking the time to properly finish outside corners, you can create a drywall installation that is both durable and aesthetically pleasing.
FAQs About Finishing Drywall Outside Corners
Finishing drywall outside corners is an important step in the drywall installation process, ensuring a smooth, professional-looking, and durable finish. Here are answers to some frequently asked questions about this topic:
Question 1: Why is it important to finish drywall outside corners?
Finishing drywall outside corners is important for several reasons. First, it creates a smooth and even surface, which is essential for a professional-looking finish. Second, it reinforces the corner, making it less likely to crack or be damaged. Third, it protects the corner from moisture and other environmental factors that can cause damage.
Question 2: What materials do I need to finish drywall outside corners?
To finish drywall outside corners, you will need the following materials: joint compound, fiberglass mesh tape, a putty knife, a corner applicator, a sanding sponge, and primer.
Question 3: What are the steps involved in finishing drywall outside corners?
The steps involved in finishing drywall outside corners are as follows:
- Clean and prime the corner.
- Apply joint compound to the corner.
- Embed fiberglass mesh tape into the joint compound.
- Smooth the joint compound.
- Sand the corner smooth.
- Prime the corner.
Question 4: How long does it take to finish drywall outside corners?
The time it takes to finish drywall outside corners will vary depending on the size of the area and the experience of the person doing the work. However, most people can finish drywall outside corners in a few hours.
Question 5: Can I finish drywall outside corners myself?
Yes, it is possible to finish drywall outside corners yourself. However, it is important to have the proper tools and materials, and to follow the steps carefully. If you are not confident in your ability to do the job correctly, it is best to hire a professional.
Question 6: What are some tips for finishing drywall outside corners?
Here are some tips for finishing drywall outside corners:
- Use a high-quality joint compound and fiberglass mesh tape.
- Apply the joint compound evenly and smoothly.
- Embed the fiberglass mesh tape into the joint compound completely.
- Sand the corner smooth and flush.
- Prime the corner before painting or applying other finishes.
Finishing drywall outside corners is a relatively simple process, but it is important to do it correctly to ensure a professional-looking and durable finish. By following these tips and taking your time, you can achieve great results.
Transition to the next article section:
Now that you have learned how to finish drywall outside corners, you can move on to the next step, which is taping and mudding drywall. This process is more complex, but it is essential for creating a smooth and even surface that is ready for painting or other finishes.
Tips for Finishing Drywall Outside Corners
Finishing drywall outside corners requires precision and attention to detail to achieve a professional-looking and durable result. Here are some tips to help you achieve the best possible finish:
Tip 1: Use high-quality materials
Using high-quality joint compound and fiberglass mesh tape is essential for creating a strong and durable corner finish. Look for products that are specifically designed for drywall outside corners.
Tip 2: Apply the joint compound evenly and smoothly
When applying joint compound to the corner, use a putty knife to spread it evenly and smoothly. Avoid applying too much joint compound, as this can make the corner more difficult to sand and finish.
Tip 3: Embed the fiberglass mesh tape completely
Once you have applied the joint compound, embed the fiberglass mesh tape into the compound using a corner applicator. Make sure that the mesh tape is completely embedded and that there are no gaps or bubbles.
Tip 4: Sand the corner smooth and flush
After the joint compound has dried, use a sanding sponge or sanding block to sand the corner smooth and flush. Sand lightly and avoid over-sanding, as this can damage the drywall.
Tip 5: Prime the corner before painting or applying other finishes
Priming the corner before painting or applying other finishes will help to create a smooth, even surface and prevent the joint compound from absorbing too much moisture.
Tip 6: Use a corner applicator
A corner applicator is a tool that can help you to apply the fiberglass mesh tape and joint compound more evenly and smoothly. This can help to create a more professional-looking finish.
Tip 7: Be patient
Finishing drywall outside corners takes time and patience. Don't rush the process, and take your time to do it right. The end result will be worth it.
Tip 8: Practice makes perfect
If you're new to finishing drywall outside corners, don't be afraid to practice on a scrap piece of drywall before you start working on your actual project. This will help you to get the hang of the process and avoid making mistakes.
By following these tips, you can achieve a professional-looking and durable finish on your drywall outside corners. This will help to protect your drywall from damage and create a smooth, even surface that is ready for painting or other decorative treatments.
Summary of key takeaways or benefits:
- Using high-quality materials and proper techniques will result in a durable and professional-looking finish.
- Taking the time to sand the corner smooth and flush will create a smooth surface for painting or other finishes.
- Priming the corner before painting will help to prevent the joint compound from absorbing too much moisture and will create a more even finish.
Transition to the article's conclusion:
Finishing drywall outside corners is a relatively simple process, but it is important to take your time and do it right. By following the tips outlined above, you can achieve a professional-looking and durable finish that will last for years to come.
Conclusion
Finishing drywall outside corners is a crucial step in the drywall installation process, ensuring a smooth, professional-looking, and durable finish. By properly finishing outside corners, you can prevent cracks and damage from occurring, maintaining the integrity of the drywall and the overall structure. It also provides a strong base for painting or applying other decorative finishes, ensuring a uniform and professional-looking result.
In this article, we have explored the importance of finishing drywall outside corners, the materials and tools required, and the step-by-step process involved. We have also provided tips and best practices to help you achieve the best possible finish. By following the guidance outlined in this article, you can ensure that your drywall outside corners are finished to a high standard, providing a strong and durable base for your walls and ceilings.
You Might Also Like
Amber Midthunder: Rising Star From Prey To Legion Of Super-HeroesThe Scariest Picture You'll Ever See
Discover The Ultimate Sleep Solution: Lebeda Mattress Reviews
The Ultimate Guide: Uncover The Weaknesses Of Ghosts
How To Easily Deposit Cash In Your Navy Federal Account
Article Recommendations